
The following is an experimental strategy for FFXI's Dynamis - Windurst EndGame Zone. Obvious enough?
 |
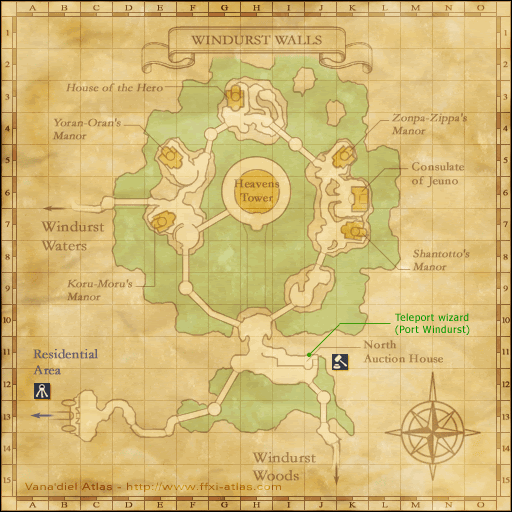
| Maps belongs to FFXIwiki. |
The above map gives basic locations of every time extension & notorious monster pop area. Our goal for a successful run will include gaining all time extensions, then relocating to an area to camp while we farm currency, relic armor, and anything else we can get these greedy Yagudo to drop. I also included a larger map of Windurst Walls, the area where Dynamis - Windurst is based. I will be using both maps as reference.
Trail Run Findings: We trio'd for a trail run for this zone, moving from the eatery point, north and then counter clockwise to hit all 5 time extensions. One of the largest issues that seems to be in most city zones is that the TE statues, known as Prototypes, are surrounded by beastmen. You either need to be sneaky and quick to kill, or have some killer crowd control. Fortunately, we have a little of both.
The first TE definitely foreshadowed times to come. Located on the small circle part of the bridge at G-13, our first TE prototype statue surrounded by two wandering monsters, with two paths that have 1-2 possible aggos each. During the trail run, we tried to zerg the Prototype down without aggro. This failed, as Yopo (RDM/BLM), had to keep linking and aggro monsters sleeping. We eventually had to kill 3 normal monsters that attacked. The biggest problem was hte Prototype's respawn was around 2 minutes, having to fight him two more times during the crowd control.
We then sneak/invis'd and headed north, making a right at H-10. We made our way to TE2, located next to the southern stairs where Shontotto's manor is.
We had less trouble with the TE here, as the only possible link is a NIN mob. If you time your attack right, you can zerg down statue while the Ninja's back is turned. You can sneak/invis right soon after, and move north onto the next TE at K-5. Watch for the NM on top of the manor. Getting to close could mean possible aggro. Now you'll run into the same time of spawn at K-5. Use strategy above, and you'll do swell. If either time the Ninja aggros, just go ahead and take it down. Watch for the Ninja's 2h, so have mages keep stoneskin and barfira on if possible.
We headed west to H-3 for the first 15min extension. The 15m mobs are slightly tougher it seems then the 20min that we've fought previously. One issue is that he's hanging out with two Summoners. A Summoner's two-hour move, Astral Flow, is a dismantler of your face when used. In most cases, wipes the entire group you're with. We lived through an aggro, as the mobs attacked Yopo then left after she was down. Thanks again for your sacrifice, my love. Once she was up and the stone was dead, we were able to move to the final TE at C-6. Little did we know, that we would not be making it farther then that..
Sudden aggro on my from trying to solo the mob, and the rest of us falling one at a time during the battle caused us to wipe completely. Thus, ending our first Windurst (test) run. We walked away with WAR relic (useless) and one piece of Windurst currency, T. Whiteshell.
The next run we do will be a another test run, as we attempt to get all the time extensions and successfully farm the zone. We'll not only need some of the relic items that drop here, but I'll also be needing about 1500 of these lovely shells. So, the following is a quick rundown of the next Dynamis - Windurst runs.

1.) Enter, Buff, and Sneak/Invis,
2.) Make our way to TE-1. While standing in the south-east corner and waiting for mobs to turn, we'll zerg down statue while Yopo watches for possible aggro.
3. Take out TE-2 while NIN isn't looking.
4. Do the same as 3, except to TE-3.
5. Standing behind TE-4, we zerg him down whole hoping not to aggro SMNs. If the SMNs see you, it'd be best to sleep their pets and pull them closer before taking them out. This will avoid possible aggro from the mobs in the water.
6. This one can be done one of two ways. Either have Yopo, our RDM/BLM sleep the lot of them while we take down TE-5 and then slowly take down other mobs. Issue here is with respawning mobs. If we only have to take one or two we'll be fine, but any more could lead to another wipe. A way to fix this would be to sleep the mobs, kill the TE, and run our asses as quick as we can through the zone to a safe location WHILE training the entire west side of the zone. We could also attempt to sac pull the whole area causing a mass-despawn once sacrificial lamb (possibly me) is down, leaving a few moments to kill TE-5 while the saclamb revives and rebuffs.
7. Return to the area we entered, as it seems to be the safest camp and resume farming. :D
I'll update after we attempt this run, and see how it works.
No comments:
Post a Comment