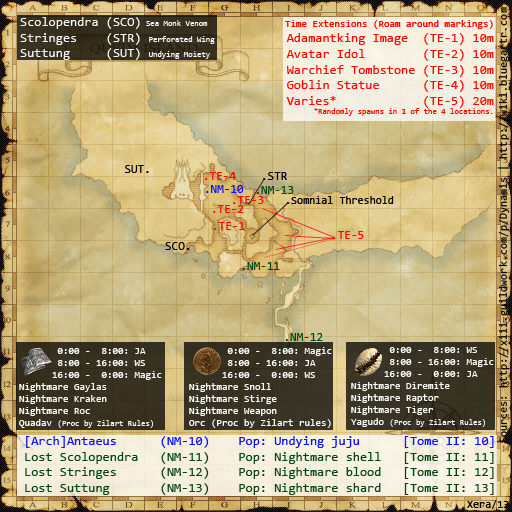
After failing to learn a spell (a.k.a. Even a BLU84 has issues soloing Marrows.) I decided to switch to SAM and try out Dynamis - Qifim. I went in not expecting very much other then maybe, if I was lucky, a handful of Dynamis Currency. Once entered I did my usual pop of a reraise scroll and used Meditate. Sneak/Invis my way from the entrance to the east to get the harder of the Time Extensions. When I finally found my target I pulled him with one of my last few demon arrows. Unfortunitly, the DC Yagudo standing nearby saw this and did not approve. Once I took out the T.E. monster, I ran to the cave just south of my current posistion while dodging any Quadav aggro. Once in a safe spot where I knew I could die and reraise safely, I turned to find only the original aggro'd Yagudo was still after me. None of the others linked including the Quadavs (Special Note: Other Beastmen won't link with each other in Dynamis anymore!)
Once I recovered from a battle that took longer then I wanted, I headed west then north for the next few T.E.s starting with the Quadav. Of course, another link would come when the Vanguard Undertaker linked. It being a SMN I knew I was in for a wipe, but then I took a chance. First I used a "Step" on the T.E. to gain a finishing move. I told myself I would 2-hour and if I could not 1-shot the Undertaker I would use my finishing move to stun the Undertaker's avatar. 2-hour used and Tachi: Shoha (Merited 4/5) took him down to 30% then I followed up with a Tachi:Kasha to finish the mob as it was preparing to feed me a Judgement Bolt for a late-night snack.
| Do you want to be the next "Avatar Idol"? |
 |
| Na-na-na-na-na-na, us! |
1.) Statues are easy but they can be a pain. Make sure you can take them out quick! Having Meditate between mobs makes it alot safer and quicker. Remember that Statues also move very slow, allowing easy links.
2.) If you have to pull a statue that will link, know the mob that will link. Remember you can only 2hour once per run, so avoid any mage-type, ninja, beastmaster, or monk mobs.
3.) Don't be afraid to try other mob rotations. Mine was the most convenient, but also had to watch for repops due to BST soloers.
4.) Nightmare Gaylas link easily. They also have some killer moves. Slipstream (stronger Jet Stream with added effect) will hurt, but no near as much as Turbulence, an AoE high damage attack. They also seem harder to proc than other mobs due to high evasion. Nothing is worse then missing a step.
5.) Nightmare Raptors can link, but not as bad as Gaylas. Frost Breath can slow your killing down, but nothing to terrible.
6.) Nightmare Stirges aren't as bad as Gaylas either, but there are only about 3-4 per camp.
7.) Remember that this run was also based on luck, preparation, gear, and knowing the job. Good luck if you try it as well!


No comments:
Post a Comment